Pages on my blog

Wednesday, 28 December 2016

An important milestone

For a long time I have wanted to knit socks. Trouble was - I don't enjoy knitting. It makes my hands hurt and the trauma of knitting lessons at school put me off going back to it in later life. However Craftsy was having a sale. I am sure a lot of you know what it's like. You are going about your daily life, not thinking of anything in particular, see a book, tutorial or class advertised or recommended and 'Ooo, how to sew a quilt/make deluxe chocolates/knit a sock. I have always wanted to try that'. Next thing you know you have bought said book, tutorial or class.

I have to say, the class was really clear and simple to follow. I don't think I would have ever got around to knitting a sock if it wasn't for that class. It was Craftsy's 'My First Toe Up Sock' with Susan B. Anderson and I would definitely recommend it for a beginner. Full instructions are given from measuring your feet correctly to finishing off the socks. You can see how stitches are formed thanks to some great close up work. I could see exactly what I was meant to do - and that is great when you are doing something new for the first time. A full written pattern is also supplied in the course materials.


This is my first pair of socks but I have already bought two other lots of yarn in order to knit more. This one is in double knit/worsted weight superwash merino. It is lovely and soft and cozy. The second will be in the same weight of wool but brighter colours (pink, purple and lettuce green). The pair after that will use Arne and Carlos' self patterning yarn. It is a finer weight and uses smaller needles. That will be a whole new challenge.

As for stopping my hands hurting while knitting - I discovered the Norwegian way of knitting. It is much like Continental knitting but with slight variations. The stitches are worked much closer to the tips of the needles and the movement is all in the finger tips instead of the whole hand and wrist. Arne and Carlos have a nice little video on YouTube where they show the basics. Definitely worth a look.

Friday, 23 December 2016

Drifting towards Christmas

A quick pic today - little decorative elements that I have attached to Christmas gifts for my family. They are made from driftwood pieces and painted in acrylic paints. The recipients can even hang them on their trees next year if they like.


Sunday, 18 December 2016

More new beads

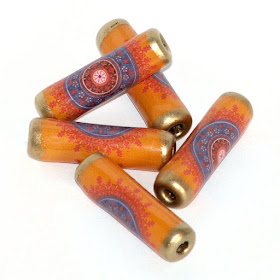
I finally got around to getting more of those beads made that I mentioned a few weeks back. Two sets, one with ethnic style elephants and the other in autumn coloured ethnic designs. As always, they are available in my Etsy store. I also found a few sets of hand painted beads that will be listed in the sale section of the store come the new year.

Elephant paper beads

Ethnic Autumn paper beads


Monday, 12 December 2016

A Christmas wreath

As Christmas approaches my Mum had been talking of getting a wreath for my Gran's grave. She has done it every year since Gran died in 2013 and usually goes to the local florist to get one. The first year we received a beautifully made wreath. So much care and attention had gone into it and it looked lovely at the graveside. Sadly, last year, Mum was not too happy with what she got for her money. So this year we decided to do the job ourselves. We picked up an artificial wreath from the local garden centre (rabbits run rampant in the graveyard and eat everything that is remotely green) and a few things to decorate it with. Gran always liked out Christmas tree. She loved the colours and the glitter and the lights. With that in mind we went to work. The finished item is certainly glorious. I hope she would approve.


Gran loved to see the robin in the garden so we added this little guy to keep and eye on things.


This is the Christmas tree that inspired the wreath. Yup! We certainly go to town with ours. It is a 'history tree' covered in things that stretch back through our family life - from vintage glass decorations to handmade glittery fish.


Sunday, 27 November 2016

A-tissue!

A little Christmas gift sewing this week. I found this nice little tutorial by Two Brown Birds for making tissue holders and wanted to give it a try. My first one (made in yellow and green and decorated with a hand made button and seed beads) came out rather nicely. So now my family will be getting tissue holders as part of their gifts this Christmas - and considering how often I make my sister cry with my choice of gift (in a good way, I promise) I think she might find this gift quite useful. I have been making more gifts for this year's festivities but I will put up photos of them later - I don't want to give too much away to those relatives who might be reading this.


Saturday, 19 November 2016

New beads for the winter season

I finally got around to creating a few new beads this week. A touch more Oriental, a little abstract, some traditional, Scandi-inspired and colourful. Some are already available in my Etsy store but the rest will be added over the next few days. There are also more in the pipework that I have not finished yet. One thing is for sure, with all those bright colours they certainly cheer up those cold, wintery days.

sunburst paper beads

Oriental Beauty paper beads

Royal Purple paper beads

Forest Fire paper beads

Oasis paper beads

In the Pink paper beads

Peace from the Orient paper beads

Winter Glow paper beads

Monday, 7 November 2016

A finished quilted project!

At last! I managed to finish a quilted project that was not made from a kit. There are so many pieces of unfinished patchwork around my work room that I really need to do something about it. I made a meditation mat for myself using a pack of Moda's 'Welcome Fall' charm squares. It is made up of disappearing nine patch squares and has made me very happy. The disappearing nine patch is so lovely. Really simple to make but looks so complex. The mat is 25 inches square. I quilted the top with a cotton wadding behind the patchwork then stitched on a back and put a square of leftover duvet (from when I was making dog beds for my sister's dogs) inside. My patch placement needs a bit of work (my obsessive compulsive side is annoyed that the bright yellow patches are all on the one side) but it is just what I needed for those rare moments of calm.


Sunday, 30 October 2016

Autumn in Scotland

I love autumn. I was up early the other morning and tried to catch some lovely images. These photos don't do the scenery justice but the colours are magnificent.


Lots of patches of mist and flog came and went - which is why this marvellous gold tree looks a bit misty.


Monday, 24 October 2016

New tutorials

I have finally got two more tutorials written. It's only taken two years, what with family life, the insane VAT changes from the EU government and a general lack of motivation to write any more tutorials because of it. But they are finally done and I have a few ideas for more.

The first tutorial is ideal for this season - how to make Dia de los Muertos brooches from paper. It covers making the base and how to decorate. I even included a few tips and hints on decorating them.


The second is how to make bejewelled Christmas tree bauble hooks. Made using copper wire and beads, they are quick to make and add that little bit of festive sparkle to what would otherwise be a boring hook.


As always, they can be found in my Etsy store.

Thursday, 20 October 2016

We can rebuild him - we have the technology

Indy has a favourite toy when she comes to visit me - the noodle donkey. She runs through the house and garden throwing noodle donkey in the air and catching him. Unfortunately he's been through the wars as Indy decided he should be bald, have two legs removed and have no innards. So he underwent major surgery this week - as you can see from the photos below. I couldn't fix his baldness but I could re-stitch and re-stuff him. Looks almost as good as new now and is back to being thrown in the air, carried round the garden and swung in the air by his legs.


Thursday, 13 October 2016

Quiliting dies

There has been a lot of talk on the craft channels about quilting dies. I know! Seasoned quilters will be having a fit at the mention of them but my cutting sucks. No matter how careful I am I still have problems. I signed up to take part in the Splendid Sampler quilt project but found it a bit more challenging than I have time for right now. I will go back to it but, right now, other things must take precedence.

Anyway, quilting dies - I bought the Sizzix half square triangle die and it is amazing. I had been watching the Accuquilt Go shows on TV and the system looks great. But for someone who is a very, very amateur quilter I can't justify the cost of it - even if I do really, REALLY love their Gingham Dog appliqué die. However I already have a Sizzix Big Shot so I tried their dies.


I am now producing patchwork that does not look like the cat regurgitated it. My points are much better and my seams are straight. Although you have to stick to the size of the cut piece it has given me confidence. I am hoping to finally make my first full size quilt now. Thank you Sizzix! I may have to order another die or two.

Wednesday, 28 September 2016

Yubinuki


There seems to be a Japanese theme to my crafting these days - kanzashi, shashiko and now yubinuki. The beauty of the internet for us creative types is that it lets us see traditional crafts from all over the world so easily. It's amazing to think that 30 years ago we may not have seem some of these marvels. These two yubinuki are my early attempts. Don't look too closely at the stitching though. It needs a little work. The blue and cream one was rather big so it has become a pin cushion.

The next three were smaller in size but by the time I got to the purple and cream yubinuki I could see a difference in the stitching. Practice makes perfect, I guess.


Yubinuki are decorative thimbles that evolved from practical tools used by Japanese craftsmen and they are spectacular. I suppose you would call them a form of embroidery. They are also surprisingly easy once you get used to making your own thimble bases. The tutorials I used to get started come from a variety of places but I have included a list here:
  •  Shishi Girl's blog post gives a nice introduction to yubinuki with some diagrams for a straight forward design.
  • The best tutorial I found for making a thimble base comes from Ma Mercerie but she also has lots of other tutorials under the search terms 'thimbles' and also 'How I make my thimbles'. There is also an index of her tutorial posts here.
  • And, of course, there is Pinterest where there is lots of eye candy and links to other yubinuki tutorial - most of which are in Japanese but you might be able to follow the diagrams. I have a dedicated Pinterest board for yubinuki now if you want to see some beautiful inspiration and ideas for using them. This image is one of my favourite picture tutorials from Pinterest (although I think the text is in Spanish) but I can't find the original link to it.
However, Gina-B Silkworks now has yubinuki kits available if you want to try and make your own. Full instructions are given along with the materials you will need. The maroon/pink and purple/cream yubinuki above came from her kits and are definitely the easiest way to get some basic materials to make your own.

Thursday, 22 September 2016

Sashiko

Over the last few weeks I have been playing with some sashiko embroidery. One of my favourite embroidery thread suppliers, Sew and So, has started to stock sashiko products, including pre-printed sashiko fabric. It is great for getting a taste for the craft  - and for getting your stitches spaced correctly. Very pleasant and relaxing.


I am not sure what I will be doing with my little panels yet but they would look great framed up, made into greetings cards, coasters or even as panels for the front of a new book. Watch this space.

Saturday, 17 September 2016

New beads

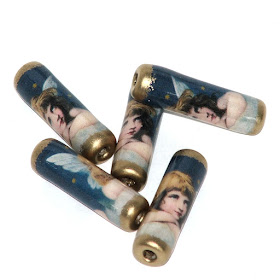
Another quick update (this is becoming a habit). Two new sets of beads are now in my Etsy shop - Stargazing Angels and Festive Angels. It has been a while since I released some new bead designs but I am working on a few more. Hopefully it won't take too long to get them out there.


Saturday, 10 September 2016

Playing with shadows

Just a quick update today. A few weeks back Gina-B Silkworks sent me some new products to play with - including these Shadow Plaques. Needless to say, I love them! There are so many things you can do with these. They are meant for displaying passementerie buttons but you could use them for displaying  art, embroidery, little pieces that show new art or craft techniques. They can be made up into gifts or kept as a record of some creative endeavour.

Sadly my photographic skills here are awful. I was having problems with my camera at the time so I could only take a quick snapshot. But if you go to Gina-B Silkwork's page for the mini shadow plaques she has better photos of my samples under the main photo along with other samples by Gina and Chris.

Monday, 5 September 2016

A birthday surprise

It was my sister's birthday in July and my present to her was a creative piece inspired by something she saw on Pinterest. However this one has silhouettes of her late dog, Stanley, and her old guy, Oz. It made her cry. But then I have a habit of giving my sister gifts that make her cry. It has become a bit of a challenge now - find the perfect gift that will create tears. Tears of joy, I hasten to add. I did give her a box of tissues before she opened it though.


It is made from a bamboo chopping board with acrylic paints, hand cut stencils and finished with polyurethane varnish.

Wednesday, 17 August 2016

More books


This book binding lark can be addictive. There is no end to the possibilities. However I will need to pace myself now otherwise my home will be filled with notebooks with no room for anything else.


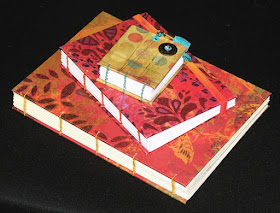
This first one is roughly 4x6 inches (10x15cm) with white pages, a hand painted elastic closure and covered in K&Co papers. Orange waxed cord was used to bind it.


My next attempt was a bit bigger - 6x8 inches (15x20cm). I had a bit of a mishap when cutting the papers (they were too big to start with, then too small - ahem!) so the edges of them were made to look deliberately distressed. I used yellow unwaxed cord for this binding along with K&Co papers to cover it. Still a lot to learn, it would seem.


My last book - or perhaps it should be called a bookling at 3x2.5 inches (7.5x6cm) - got some jazzy treatment. Basic Grey papers, turquoise waxed cord for binding, a paper bead, handmade silk cord closure with a handmade silk tassel and a We R Memory Keepers snap. Sadly the gem in the snap got a bit crushed during insertion but the overall effect is for a distressed book so it fits well. All the internal papers and cover boards were offcuts from the larger projects.


Of course, I haven't used any of them yet. The big one with the moths on the front is meant to be an ideas book for my business. Trouble is, I can't bring myself to write in it - which is very silly as I could always make myself another one. One day soon I will get the pen out and make my mark in it.