Recently my Mum got new curtains for her kitchen. As always seems to be the case with shop bought curtains, they were way too long and she had to cut them to fit. The offcuts were adopted by me. So, when I was looking to try out some project bag designs I headed straight for the spare fabric.
I managed to get three bags out of one of the remnants. The first one is a medium size bag that I am keeping my current knitting in, a scarf using Olann 4 ply yarn. It was made by folding a rectangle of fabric in half, stitching up two sides (remembering to add the handle to one side before stitching) and adding a zip to the top. Not rocket science and does the job very well. The Olann yarn is wonderful, by the way. I'm very excited about using it.
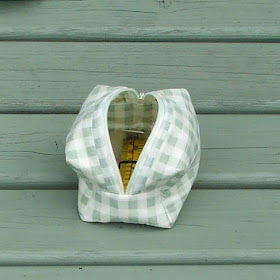
The next one was made using an image I found on Pinterest. Unfortunately I cannot find it now but there were no written instructions, just a picture of a pattern and a few photos to show the construction. So it was all a bit hit or miss - and a few choice words. But it worked out OK. It's a cute little cube bag that will hold my smaller knitting tools like stitch markers, measuring tape and stitch counter.
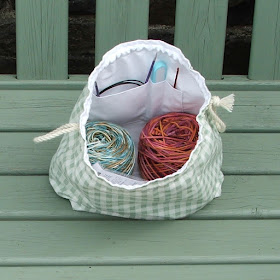
The last one is a bigger bag. There is a canvas knitting bag that is very popular at the moment. I have seen them on a few blogs and vlogs. However, when I went to check them out I choked on my cup of tea when I saw the price. What? £60 for a project bag!!! (That's $65 US or €68.) Erm, there is no way I could afford to pay that for a project bag, even if it was rather nice. So I tried to make a similar design myself, without a pattern.
The 'real' project bag has a very simple construction. No fancy panels, it's pretty much cut from one piece of fabric, has no lining and just a couple of pockets inside. I didn't want to copy the design precisely but there were some elements that I liked, e.g. the yarn guides on the inside pocket and the drawstring. I also added a lining to mine as the curtain fabric was quite lightweight.
I am pretty pleased with how it looks. I hand twisted my own drawstring using some 4ply woollen yarn I had in my stash. The eyelets were the hardest part. The instructions always say, 'tap lightly with a hammer' when they really mean 'beat the 'so-and-so' into submission using all your strength'. But it is done and I am happy. It is my first fully functioning knitting bag with lots of pockets and with a multitude of uses.


No comments:
Post a Comment
Thank you for leaving a comment for me. It is always nice to hear from people. However, anonymous and spam comments will not be published.