

Showing posts with label halloween. Show all posts
Showing posts with label halloween. Show all posts
Thursday, 12 July 2018
Return of some favourite paper beads
I have some favourite paper beads back in stock after a year on vacation. Vintage Music, Vintage Script and Day of the Dead are all back on Etsy. They were some of my best sellers for years but, eventually, their popularity waned and I gave them some time off. In October, however, my Etsy store (and the beads) will be 10 years old and I feel it was only right that these beads get to take part in the celebrations. More news on that to come nearer the time.


Tuesday, 19 September 2017
Pumpkins!
It has been quiet here. Lots of bead making, of course, and a few partially finished knitting and sewing projects. One of the things I have managed to finish is a cute little knitted pumpkin from a pattern by Denton Foreman on Ravelry. The Pumpkin Spice pattern is so easy to follow, even for a beginner knitter like me. I even learned a new technique - purl front and back. I have already started on another one and suspect the house will be full of knitted pumpkins this autumn.


Monday, 24 October 2016
New tutorials
I have finally got two more tutorials written.
It's only taken two years, what with family life, the insane VAT
changes from the EU government and a general lack of motivation to
write any more tutorials because of it. But they are finally done and
I have a few ideas for more.
The first tutorial is ideal for this season - how
to make Dia de los Muertos brooches from paper. It covers making the
base and how to decorate. I even included a few tips and hints on
decorating them.

The second is how to make bejewelled Christmas tree bauble hooks. Made using copper wire and beads, they are quick
to make and add that little bit of festive sparkle to what would
otherwise be a boring hook.

As always, they can be found in my Etsy store.
Sunday, 10 October 2010
Mini gift cards for Halloween
I am in love with Stampotique Originals' stamps. In particular the ones by Daniel Torrente with their scruffy, detailed, gothic style images. Last week I treated myself to some of the new release Halloween stamps including Halloween Cube 2 and Puss, Puss to go with Mr Stripes, whom I bought last year. They are just so cute and have a slightly forlorn look that is hard to resist. But then I'm a sucker for a sad pumpkin. However, I also came across Sue Roddis' fabulous bookmarks using the same stamps and had to try them myself. These are the results but instead of making them into bookmarks (I couldn't find mini magnets to use as closures) I have kept them as little gift cards. The two little squares at the bottom are made with offcuts of decorated paper, using shiny foils and texture plates. They are yet to find their destiny but would fit on little cards as toppers. They actually came about as I had a couple of stamped images left over and they just demanded to be used - and who am I to refuse a pumpkin!


Sunday, 26 September 2010
Tag! You're it!
I received my new Tim Holtz Alterations dies this week. The halloween dies are being released in a short burst and then, once sold out, won't reappear until after the turn of the year. I was worried that I was not going to be able to get hold of any but luckily one British company had them on pre-order. Yippee! So, when they arrived on Tuesday devoted the day to playing with them. I only ordered the Witching Hour and Raven/ Scaredy Cat dies (along with Reindeer Flight which I have to wait a little longer for) but guess who is regretting it now? I have already decided that I need the row of houses, the Once Upon a Time alphabet die and at least one of the Texture Fade embossing folders. It's just as well my birthday isn't too far away.
These are some of the tags I made this week. Lots of distress ink and alcohol ink - not to mention plenty of mess. But that's the fun of playing.

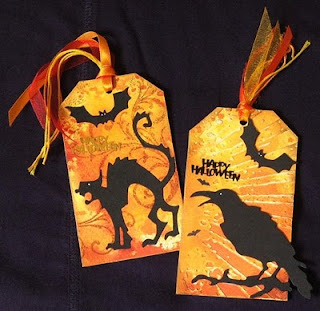
These are some of the tags I made this week. Lots of distress ink and alcohol ink - not to mention plenty of mess. But that's the fun of playing.


Wednesday, 8 September 2010
Birthday biz
There has been a flurry of big birthdays in my family recently with more to come so making birthday cards has been top of the agenda. My Gran was 91 at the end of August and my Uncle and Aunt will both be 70 this month. However, to top off the birthdays this year is my Grandfather's at the end of the year. He will be 100. It is hard for me to imagine what that would be like. He still lives by himself and is fiercely independent so it even more amazing. Anyway, I have added a couple of the birthdays cards here. The first uses K and Co papers but the photo doesn't show it off at its sparkly best. The papers are foiled and I added some glitter and a shiny blue peel off to match the foiling. The other card is made from a kit bought from QVC UK and designed by their resident craft expert, Dawn Bibby. It's a lovely kit, pale and soft but with foiling and lots of butterflies and dragonflies.
The other photos include some of my Halloween themed swaps - a ribbon fairy/witch swap and a recipe card swap. But, not content with paper crafts I have gone back to making some jewellery. The pictures here are some of the pieces I have uploaded to Etsy. I enjoy making jewellery very much but I don't wear jewellery very often. So I figured maybe I could make a little money selling it. We shall see if it works out that way. The final photos are of a couple of Halloween bookmarks made using Cosmo Cricket papers and some of my own zany skulls which were then laminated. One is for a swap buddy and the other is currently in my copy of The Lost World by Arthur Conan Doyle. You can never have too many bookmarks.


The other photos include some of my Halloween themed swaps - a ribbon fairy/witch swap and a recipe card swap. But, not content with paper crafts I have gone back to making some jewellery. The pictures here are some of the pieces I have uploaded to Etsy. I enjoy making jewellery very much but I don't wear jewellery very often. So I figured maybe I could make a little money selling it. We shall see if it works out that way. The final photos are of a couple of Halloween bookmarks made using Cosmo Cricket papers and some of my own zany skulls which were then laminated. One is for a swap buddy and the other is currently in my copy of The Lost World by Arthur Conan Doyle. You can never have too many bookmarks.


Saturday, 21 August 2010
Spooktacular downloads
Yes, I know. I'm obsessing over Halloween. So many of my recent post have been about it but I guess it's too late to go back now. Soon October will be here. Yippee! But this week I created some new digital downloads for my Etsy store - spooky ones with plenty of creepy action going on. The first set consists of four small envelopes made using my own photos and some digital images I created. The second is a collection of three small envelopes with images by Harry Clarke. Both sets are ideal to print out and give little treats or spooky notes in. The larger set is ideal for ATCs too.


Sunday, 8 August 2010
Gothic art
 I finally got round to finishing up my final piece from the Mixed Media Gothic Art workshop I mentioned last time. It is painted in acrylic and markers with collaged elements. The bats are a Sizzix die, the skull, crow and girl were all drawn by me and coloured with markers. I had great fun with this short course. This summer has been spent trying out new ideas and techniques for my art but most of it has been done by myself, without any guidance. But I have to admit that it is nice to have a course material to follow and videos to watch. The videos are a great help. You can actually see how lines are formed the artist and that makes a huge difference when you don't have confidence in your own mark making ability.
The mermaids are coming along too. At the moment though they have the shoulders of Olympic swimmers and the hands of boxers. I am going to have to work on giving them a little more grace and finesse. But I will post some pictures once they look a bit more like mermaids.
Tuesday, 3 August 2010
Skull skill
I signed up for an Art Trader online workshop a couple of weeks ago and have been having such fun. I started with the Gothic Art one and have been learning how to draw little goth girls and associated goth bits and pieces. The course covers how to draw basic features, bodies, how to put together a goth girl, clothing, themes... the list goes on but you can find out more by visiting this link.
Anyway, the goth scene often involves skulls so I thought I would put together a little tutorial on drawing zany skulls. Skulls are often seen as white, cream, grey or even black but my idea is to make skulls that are a little more, well, zany. I love colour and don't see why skulls should always been the same. So this idea just seems to be a little different. If you look at the photos you'll be able to follow along with the text.

In the first photo we have figure 1. - the starting point. Draw a letter 'C' lying on its face, i.e. lying with the open end of the letter facing downward. You can vary this shape to be long and thin or short and fat. In figure 2. half of a slightly rounded rectangle is added to the opening of the 'C', extending downward. That's not a very clear description but I hope you can see from the photo what you have to do. You can make this rectangle as long or as short as you like or even make it slightly more triangular like the two skulls beneath. Figure 3. shows the features that I added to mine. Eye sockets don't have to be round or equal in size. Just do whatever you fancy.
Now, this is just a basic skull (drawn with a rather shaky hand too - sorry) but what makes them zany is that you can either fill them with colour using acrylics, markers, coloured pencil, etc or draw them on patterned paper like scrapbook paper or paper you have painted yourself. I have included a photo of some that I have made using both techniques.
 The last three photos are of skulls I made and used in some creations. The first is a collection of inchies, the second two are collages I did for the Gothic Art course.


 By the way, I loved the Gothic Art course so much I signed up for the Whimsical Mermaid class this week ;o) Even if you don't want to take a class you might want to check out their FREE online magazine. It's brilliant, full of information on ATCs, journals, altered art and related techniques.
Anyway, the goth scene often involves skulls so I thought I would put together a little tutorial on drawing zany skulls. Skulls are often seen as white, cream, grey or even black but my idea is to make skulls that are a little more, well, zany. I love colour and don't see why skulls should always been the same. So this idea just seems to be a little different. If you look at the photos you'll be able to follow along with the text.

In the first photo we have figure 1. - the starting point. Draw a letter 'C' lying on its face, i.e. lying with the open end of the letter facing downward. You can vary this shape to be long and thin or short and fat. In figure 2. half of a slightly rounded rectangle is added to the opening of the 'C', extending downward. That's not a very clear description but I hope you can see from the photo what you have to do. You can make this rectangle as long or as short as you like or even make it slightly more triangular like the two skulls beneath. Figure 3. shows the features that I added to mine. Eye sockets don't have to be round or equal in size. Just do whatever you fancy.
Now, this is just a basic skull (drawn with a rather shaky hand too - sorry) but what makes them zany is that you can either fill them with colour using acrylics, markers, coloured pencil, etc or draw them on patterned paper like scrapbook paper or paper you have painted yourself. I have included a photo of some that I have made using both techniques.
 The last three photos are of skulls I made and used in some creations. The first is a collection of inchies, the second two are collages I did for the Gothic Art course.

 By the way, I loved the Gothic Art course so much I signed up for the Whimsical Mermaid class this week ;o) Even if you don't want to take a class you might want to check out their FREE online magazine. It's brilliant, full of information on ATCs, journals, altered art and related techniques.
Tuesday, 13 July 2010
Buried treasure 2010
As many of you will know, Seth from The Altered Page is running Buried Treasure again. This is where we get to pick our favourite posts that we have put on our blogs. Last year was pictures from my nature notebook (still my all time favorite post) so what could I pick this year? Well, as it is getting closer to October (yes, I'm looking forward to autumn already) I thought I'd pick my Halloween post from last year. Entitled 'Halloween treats' it is full of the creative goodies I made for last Halloween - my favourite celebration. I hope you will all enjoy looking back with me.
As promised here are some Halloween goodies that I have been working on. Tim Holtz in his 'tricks & treats' blog post gave some great ideas for creating wonderful arty pieces and Ten Two Studios has some instructions on using matchboxes in the 'project' section of the web site. So I took my lead from those ideas and here they are. Some have been swapped out for group or one to one swaps but all of them were fun to do.


As promised here are some Halloween goodies that I have been working on. Tim Holtz in his 'tricks & treats' blog post gave some great ideas for creating wonderful arty pieces and Ten Two Studios has some instructions on using matchboxes in the 'project' section of the web site. So I took my lead from those ideas and here they are. Some have been swapped out for group or one to one swaps but all of them were fun to do.


Wednesday, 28 October 2009
Halloween treats
As promised here are some Halloween goodies that I have been working on. Tim Holtz in his 'tricks & treats' blog post gave some great ideas for creating wonderful arty pieces and Ten Two Studios has some instructions on using matchboxes in the 'project' section of the web site. So I took my lead from those ideas and here they are. Some have been swapped out for group or one to one swaps but all of them were fun to do.
Sunday, 25 October 2009
Recipes for a sweet life
OK! I know! Until recently it has been a whole month since I posted. It has been busy here with everything from a new shower being installed (huge mess!) to me having a horrible cold. Now that things are quieting down - don't speak too soon, Gillian - I will hopefully have more time to create and post.
Over recent months I have been taking part in swaps for some things I have never tried before. The first of them was recipe cards. I like simple cooking - not for me standing, over a hot stove for hours on end. Just think Mediterranean cookery - mmmm, simple and tasty. So swapping recipe cards was new and fun. Of course, the first swap was for sweets and treats so the diet was put on hold while I tried some of them.
The other cards here revolved around other kinds of recipes - there is a facial scrub and some lemon balm tea. So even if you're not the world's best cook there is a recipe out there to suit - it just needn't be for something edible.
The bottom photo is for my ongoing tip in swap - it just had to be a Halloween theme for October.
I have more pictures to post but I'll be adding them throughout the week.


Over recent months I have been taking part in swaps for some things I have never tried before. The first of them was recipe cards. I like simple cooking - not for me standing, over a hot stove for hours on end. Just think Mediterranean cookery - mmmm, simple and tasty. So swapping recipe cards was new and fun. Of course, the first swap was for sweets and treats so the diet was put on hold while I tried some of them.
The other cards here revolved around other kinds of recipes - there is a facial scrub and some lemon balm tea. So even if you're not the world's best cook there is a recipe out there to suit - it just needn't be for something edible.
The bottom photo is for my ongoing tip in swap - it just had to be a Halloween theme for October.
I have more pictures to post but I'll be adding them throughout the week.


Subscribe to:
Posts (Atom)