Showing posts with label crochet. Show all posts

Sunday, 17 February 2019

Journal Planner Charm Tutorial

Planners seem to be a big thing this year. Big ones, small ones, red ones, blue ones. OK, I'm starting to sound like Dr Seuss. But they do seem to be everywhere on blogs, YouTube and Facebook. Not to mention every kind of accessory you can imagine - and yes, I have been caught up in it all. I have not only bought several journals recently but I have been making them too. More on that in a future post.

However, among the accessories I am seeing is 'journal jewellery' - planner charms that hang from the elastic of travel journals. When I saw the cute little charms I knew that my paper beads were ideal for the job - and so this little tutorial was born.

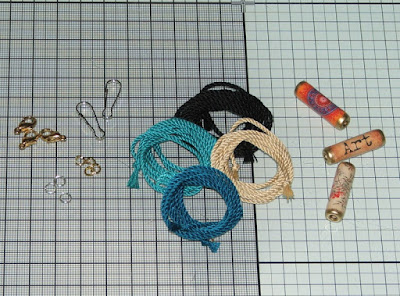
journal charm


Materials:
Wide hole beads (the ones here were made by me and, sadly, no longer available for sale)
Silk cord (available in my Etsy store)
Lobster clasp (or other clip for attaching the charm)
4mm jump ring
Thread (roughly 10-13cm (4-5 inches)

Tools:
Scissors
Pliers


how to make journal charms

Method:

1. Cut a length of silk cord roughly 20-25cm (8 -10  inches) long. The longer the thread is the easier it will be to tie the knots in it. Fold the length of cord in half.


2. Place a piece of thread between the fold of the cord so it can be folded in half too. You are going to use it like a needle to thread the bead onto the cord.


3. Push both ends of the thread through the bead hole until they come out of the top. Then pull the bead onto the silk cord.


4. Tie a knot in the top of the cord where the fold is leaving a small loop to attach a jump ring onto.


5. Pull the bead up to the knot and tie a second knot underneath the bead.


6. Take the two loose ends of cord and tie one knot in each tail. Make the tails as long or as short as you like. Trim any excess cord from the ends.


7. Use pliers to attach a lobster claw using a jump ring.


8. That's it! Clip the charm into your journal. You can also use them on bags or as knitting and crochet stitch markers too.


journal jewellery

Please excuse the not-so-brilliant photos this time. It has been dull, grey and blowing a gale for the last two days and I could not get outside to take decent sample photos. Roll on Spring!

Saturday, 30 April 2016

Mr Thunderstomp

Meet Mr Thunderstomp. I bought the book Edward's Menagerie recently because I saw a giant version of the rhino pattern and fell in love with it. I have been crocheting for a few years now but have never felt like trying amigurumi before. But the rhino stole my heart as soon as I saw him.


I had some problems figuring out the pattern but thanks to a search online I found that it used a shorthand version of crochet instructions. Once I figured that out the crochet made up really quickly. Each leg took about 40 minutes to crochet. I used Cygnet Seriously Chunky yarn and it was lovely to use. It's acrylic but much cheaper than the yarn recommended in the book - and for such a large animal it would have cost a small fortune to make him in anything other than acrylic.

He is almost 16 inches (40cm) high when seated. I used seven 100g balls for the body and part of a 100g ball for the horn. So it's quite a lot of yarn. But I do love him. I already have plans to crochet another animal - a rottweiler. Although the book does not have any dog patterns they can be easily adapted for anyone with a bit of crochet experience. No doubt I will post the finished article once I get round to making it.

Friday, 29 March 2013

Craft of the Month - Crochet


Crochet was another craft I always wanted to try. Unfortunately, before the invention of the internet and YouTube, you either had to be taught to crochet by someone you knew or from illustrations in a book or pattern. Oh dear! I never knew anyone who crocheted so I had to try and read those illustrations. It never worked. I tried several times but I couldn't grasp it. Two years ago it suddenly dawned on me that there was bound to be 'how to' videos online. I found Nexstitch's website that had cute little videos of one stitch at a time and I picked it up immediately. It was amazingly simple. After all those years I could crochet.


Just so you are aware, I should mention that there is a difference in crochet stitch names for British and US crocheters. I did not know this at the time so I ended up learning to crochet American style. The difference between the two sets of terms is not that great though. British crochet starts with it's most basic stitch as the double crochet but US crochet starts with single crochet. The rest are as follows:

British - double crochet (dc) / US - single crochet (sc)
British - half treble (htr) / US - half double crochet (hdc)
British - treble (tr) / US - double crochet (dc)
British - double treble (dtr) / US - treble (tr)
British - triple treble (trtr) / US - double treble (dtr)

As you might expect, my first attempts were not brilliant. They were recognisable as crochet but I had problems remembering to catch the last stitch on a row. As a result my first scarf (the one below) started off five inches wide and ended up three inches wide.


 However it wasn't long until I was producing much better results. I headed to the Lion Brand website where they have lots of free patterns and a Learning Centre and joined Ravelry. I advanced from scarves (including the pink one made using a jumbo crochet hook and four different yarns at once) to fingerless mitts and to a beanie hat (which has come in very handy this winter).


My current crochet love is freeform crochet. I came across the 'Freeform Crochet and Beyond' book by Renate Kirkpatrick and fell in love with the colours and textures that can go into making bags, hats, scarves, or anything else your imagination might demand. Renate has a website which has loads of inspiration and instruction on different crochet stitches like bullions and puff stitches. It has opened another door to the possibilities that crochet offers.