

Sunday, 22 December 2019
Festive greetings and best wishes for 2020
I just want to wish all my followers a happy and peaceful festive season. I know a lot of people find this time of year difficult, and this year has been very difficult for some of us, but I am looking forward to a better year in 2020 with more creativity and a more peaceful path for us all. Thank you for following my work this year. I appreciate it very much and hopefully in 2020 I will have more creativity to share with you all - and maybe a few new changes of direction too.

Sunday, 13 October 2019
How to make a glued notepad
One of my new Etsy products is a digital download of notepad pages that can double as journal cards for memory books, journals and scrapbooks.

However I
recently discovered how to make your own glued notepads while looking for
something else entirely. Isn't it always the way? My first notepad was made using
scraps of leftover paper. But it is so simple that I wanted to make
something a bit more decorative and realised my art made the prefect
subject matter for some cute notepads to scatter through the house.
Tools
and materials:
10
printouts from the PDF included with these instructions. I use plain
copy paper in 70-100gsm (roughly 20 - 24lb in the US).
Tacky
PVA glue (It has to be tacky glue that is nice and thick. I use
Aleene's Tacky Glue.)
Paper
trimmer or scissors
Spring
clamps
Method:
- Print out ten copies of the notepad papers. That makes 40 sheets of paper for the pad. I used the printer's standard settings but you can use a higher quality print if you prefer.

- Cut each of the sheets out using the grey outlines as a guide.

- Bundle all of the sheets together and make sure all the sides line up and are straight, especially the top edges. Clip the bundle of papers together near the top of the pad using the spring clamps. You want the top of the bundle of papers to be nice and tight and firmly squeezed together.
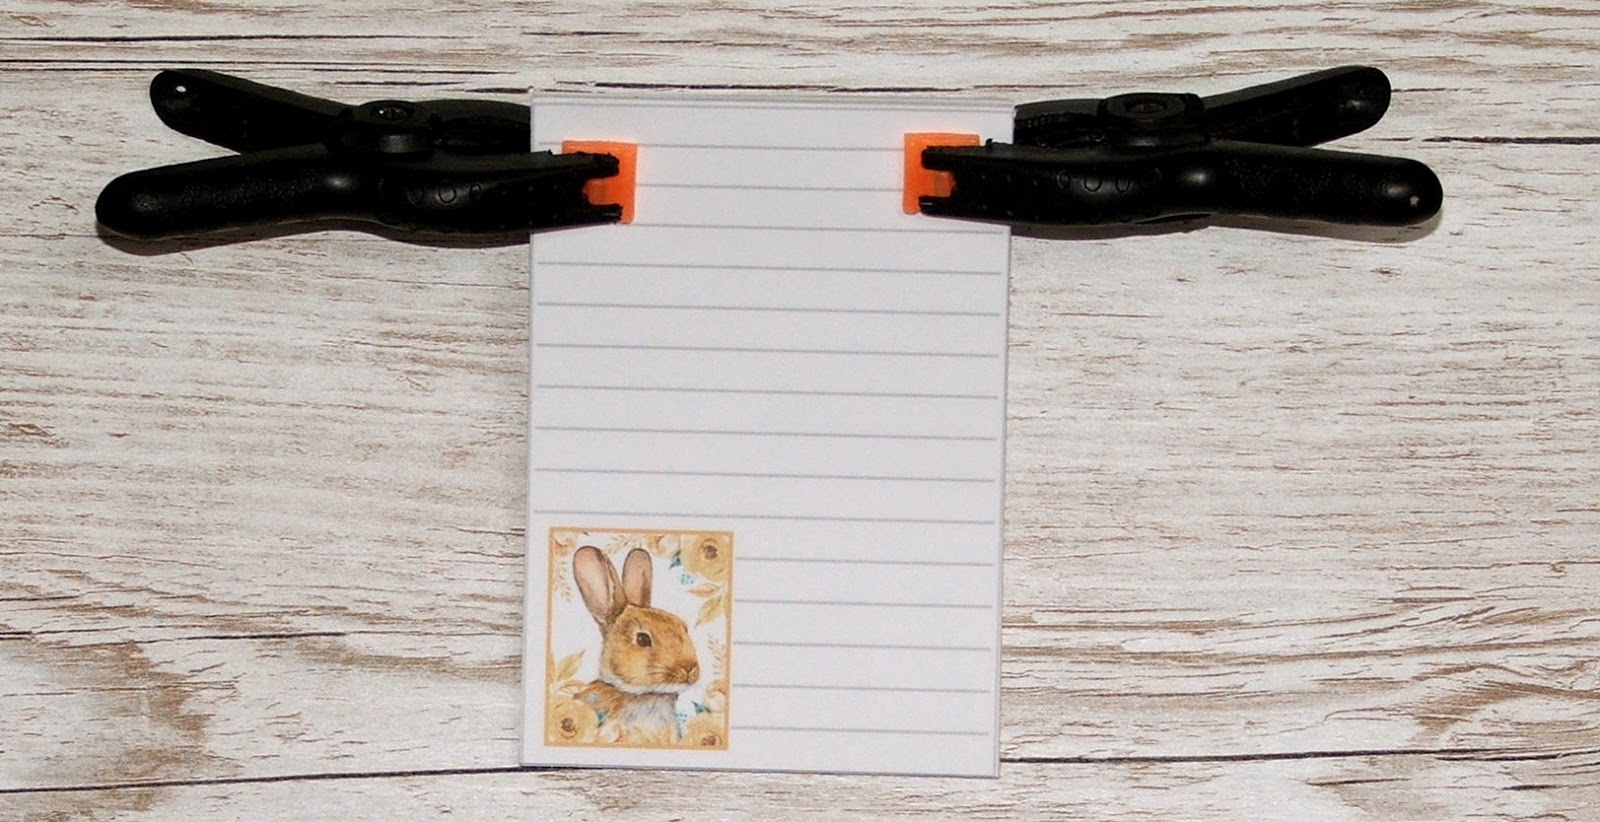
- Take the top off of the tacky glue and squeeze a generous amount along the top of the paper bundle. You want to smooth it out either using your finger or a little piece of card but don't mash the glue into the top of the paper or you will get glue oozing in places you don't want it. Let that layer dry. Then squeeze a second layer of glue on top of the first once it has dried. Again, make it a generous layer, smooth it out and let it dry.

That's
it! You have a great little notepad using some cute images.
Alternative
ways to use the sheets
Instead
of using the glue method, you can hold the sheets together using a
fancy bulldog clip or punch holes along the top of the pad and fasten
the sheets together with string or hinged book binding rings.

You
can also use the sheets for journaling or scrapbooking too.

Wednesday, 11 September 2019
Cute digital greetings cards
I have a new product line available on Etsy today - printable greetings cards of my art. I have always wanted to design greetings cards and submitted designs to various card publishers over the years. I was even 'headhunted' for designs for the Royal Society for the Protection of Birds (RSPB) a few years ago. Sadly none of the opportunities came to anything but I still wanted my art on greetings cards.

Like so many things in life - sometimes you have to do it yourself. Although these are digital downloads, if they sell well, I hope that I will be able to produce proper cards in future. The beauty of these digital downloads is that they allow you to print cards out at home as many times as you need. If you need birthday, anniversary or even just 'hello!' cards for lots of people they make a great investment. I have bought a few digi-cards in my time for exactly that reason. I have 5x7 inch and 5x5 inch cards at the moment and all are blank for your own message - and therefore great to use for any occasion.

I am hoping they will do well. It is an ever growing struggle to find customers and the ideal product these days. Being a rather un-imaginative person, it is twice as hard. I'm more at home walking in the hills than being the fun loving, social butterfly we are supposed to be online. However, if all goes well, I am hoping to produce other digital products soon. Next on the cards are digital prints but I'm considering craft products too. Only time will tell.
Friday, 30 August 2019
A new adventure with wildlife watercolour painting
There has not been a huge amount of creativity going on here lately. Things with Etsy have rather taken the wind out of my sails so I have had a quiet month or so to try and find a way forward.
However, on the bright side, I have been painting a lot more. I have had some ideas for a new product line that moves away from the hand made supplies I have offered for nearly 11 years. It's all a bit hush hush yet but it does involve my paintings. Over recent years the painting has had to take a back seat - much to my disappointment. I am hoping that in future I will be able to use my artistic skill much more and people will be able to buy products with some rather cute members of the British wildlife community on.

These guys are two of the pieces I have finished up. There are others including otters, woodmice and even moths. The big issue now is producing digital files for them. That's the scary stuff that has a steep learning curve. But, as they say, onwards and upwards. For the first time in a while I am feeling inspired and excited. I will keep you updated on how things go forward.
Tuesday, 16 July 2019
New tutorial download for wildlife brooches
A quick update on another new downloadable tutorial. This time the 'step-by-step how to' show you how to make wildlife brooches using six original templates designed by me. It was inspired by some little polymer clay brooches I had as a child. They were so cute - a hedgehog, a rabbit and a sheep - and I wore them religiously. These brooches, although made of paper, are long lasting thanks to a coat or two of varnish and simple to construct.

The animals that are included are a fox, a seal, a bear, whale, a bird and a hen and were designed by me specifically for this tutorial. Each one is roughly 1.5 inches (4 cm) at its widest point.

There are 12 pages of instructions, 26 full colour photos and hints and tips on decorating them. However you can also use them for other kinds of jewellery (imagine some really cute little earrings) or for scrapbooking, card making and other paper crafts

I love these little guys. In my opinion they are just as cute as the polymer clay brooches I had as a child.
Saturday, 13 July 2019
New round, chunky paper bead tutorial
After five years I actually have a new paper bead tutorial for sale on Etsy. The EU's digital VAT (sales tax) on digital products put me off writing any more. However Etsy seem to be handling the submission of tax receipts to all countries now and with Etsy's changes to their search system I need to diversify a bit more. More digital products will be on the way including some new ones incorporating my art.
Anyway, about these beads, I saw this round chunky style of paper bead made in polymer clay, and more recently in ceramic, and love the shape. Something a little different from the usual style of paper beads but still very simple to do with a round paper punch. I actually came up with the idea three years ago but it has take me this long to think about making it into a tutorial - ahem!

They make great additions to bracelets, earrings and necklaces. You can choose the colours to suit your project and add any decorations you like - or leave them plain. You can also use them to decorate journals with planner charms or bejewelled bookmarks. As they are so light you can use them and not worry abut the weight.

As part of my digital download production line, I have a couple more tutorials in the pipework and hope to have them available soon.
Thursday, 11 July 2019
Etsy and the great free US shipping debate

Many of you will have seen that Etsy is now requiring all sellers to offer free shipping to the USA if they want their products to be found in searches by US customers. Yes, even overseas sellers like myself. I am sure you can guess how that went down in the community. 50% of my sales are to the US so I have spent the last few days thinking about a way to offer this. It is just not possible. I cannot find the words to express how disappointed I am with Etsy for this move. It shows me that overseas sellers are totally unimportant to Etsy, that Etsy has no respect for a seller's ability to find their own pricing strategy and that profit and the standing of the shareholders is the only thing that is important to them.
At the end of last year Etsy had 39.4 million buyers and 2.1 million sellers (according to Wikipedia). According to Erank's market report 57.2% of users are from the USA. Only 5.3% are from the UK. You can see that there is a much bigger user base in the USA than in the UK - and a much bigger customer base.
Many people have said 'Etsy is a business, they need to make a profit'. They do, yes, but they are dragging sellers further and further down in the name of that profit. They are alienating the people who make those profits possible. Etsy was set up to give creative people an outlet, to support them and create a healthy trade in handcrafted and vintage goods. It is no longer about producing hand made items and selling them at a price that exhibits pride in your work and respect for our customers. It is about offering the cheapest price possible.
Where my beads and silk cords are concerned, they will not withstand a price increase to cover the cost of US shipping. My bead sets cost £4.30 ($5.31 US) and US shipping costs £3.45 (not including Etsy's shipping fees and the cost of packaging materials). You can see that increasing my prices to £7.75 ($9.57 US) would lead to no sales. 'Offer free shipping on orders of more than $35', says Etsy. It would take an order for seven sets of beads to get to the $35 level. Just to recover the shipping cost alone I would need to increase my prices by 58 pence (72 cents). By the time I have done that it means shoppers only need to buy six sets of beads to reach $35. So I need to increase the price a bit more. All I am doing is offering my beads at a much more expensive price to all my buyers all over the world to subsidise free US shipping - and probably decreasing the number of sales due to the unnecessary price hike.
I am ashamed of Etsy. I am sad. We creative people deserve better than what Etsy is giving us. I won't be offering free US shipping. I will be offering a reasonable shipping fee to the US and prices on my products that are respectful of my work and my customers. It might mean the end of my business but I can only do what I can do.
Monday, 15 April 2019
Springtime paper beads
I had hoped to have a few more sets of paper beads to release this spring but life sometimes gets in the way. They were supposed to be available at the start of April but my sister was in a car accident and it was all hands on deck to deal with family stuff. Thankfully she is OK but the car was a write off.

Anyway, back to the beads. One set is reminiscent of a Moroccan pond in the moonlight - and called Moroccan Moonlight. There is something about Morocco's art and architecture that I just love.

The second set is Celtic Inspired. The pattern reminds me of Medieval manuscripts with its flowing leafy vines and bright colours. These ones are in green, pink and purple with a distressed vintage background.

As always, they are available in my Etsy store
Sunday, 17 February 2019
Journal Planner Charm Tutorial
Planners seem to be a big thing this year. Big ones, small ones, red ones, blue ones. OK, I'm starting to sound like Dr Seuss. But they do seem to be everywhere on blogs, YouTube and Facebook. Not to mention every kind of accessory you can imagine - and yes, I have been caught up in it all. I have not only bought several journals recently but I have been making them too. More on that in a future post.
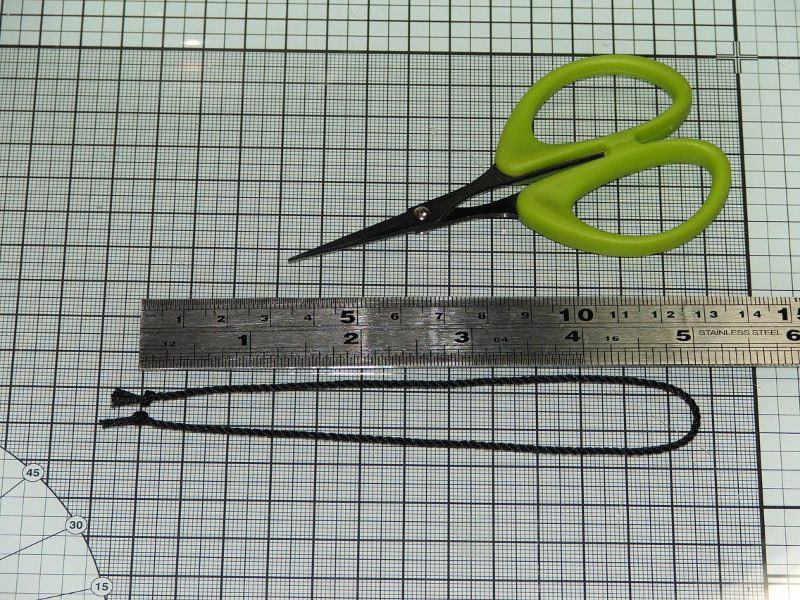
However, among the accessories I am seeing is 'journal jewellery' - planner charms that hang from the elastic of travel journals. When I saw the cute little charms I knew that my paper beads were ideal for the job - and so this little tutorial was born.

Materials:
Wide hole beads (the ones here were made by me and, sadly, no longer available for sale)
Silk cord (available in my Etsy store)
Lobster clasp (or other clip for attaching the charm)
4mm jump ring
Thread (roughly 10-13cm (4-5 inches)
Tools:
Scissors
Pliers

Method:
1. Cut a length of silk cord roughly 20-25cm (8 -10 inches) long. The longer the thread is the easier it will be to tie the knots in it. Fold the length of cord in half.

2. Place a piece of thread between the fold of the cord so it can be folded in half too. You are going to use it like a needle to thread the bead onto the cord.

3. Push both ends of the thread through the bead hole until they come out of the top. Then pull the bead onto the silk cord.


4. Tie a knot in the top of the cord where the fold is leaving a small loop to attach a jump ring onto.

5. Pull the bead up to the knot and tie a second knot underneath the bead.

6. Take the two loose ends of cord and tie one knot in each tail. Make the tails as long or as short as you like. Trim any excess cord from the ends.

7. Use pliers to attach a lobster claw using a jump ring.

8. That's it! Clip the charm into your journal. You can also use them on bags or as knitting and crochet stitch markers too.


Please excuse the not-so-brilliant photos this time. It has been dull, grey and blowing a gale for the last two days and I could not get outside to take decent sample photos. Roll on Spring!
However, among the accessories I am seeing is 'journal jewellery' - planner charms that hang from the elastic of travel journals. When I saw the cute little charms I knew that my paper beads were ideal for the job - and so this little tutorial was born.

Materials:
Wide hole beads (the ones here were made by me and, sadly, no longer available for sale)
Silk cord (available in my Etsy store)
Lobster clasp (or other clip for attaching the charm)
4mm jump ring
Thread (roughly 10-13cm (4-5 inches)
Tools:
Scissors
Pliers

Method:
1. Cut a length of silk cord roughly 20-25cm (8 -10 inches) long. The longer the thread is the easier it will be to tie the knots in it. Fold the length of cord in half.
2. Place a piece of thread between the fold of the cord so it can be folded in half too. You are going to use it like a needle to thread the bead onto the cord.

3. Push both ends of the thread through the bead hole until they come out of the top. Then pull the bead onto the silk cord.


4. Tie a knot in the top of the cord where the fold is leaving a small loop to attach a jump ring onto.

5. Pull the bead up to the knot and tie a second knot underneath the bead.

6. Take the two loose ends of cord and tie one knot in each tail. Make the tails as long or as short as you like. Trim any excess cord from the ends.

7. Use pliers to attach a lobster claw using a jump ring.

8. That's it! Clip the charm into your journal. You can also use them on bags or as knitting and crochet stitch markers too.


Please excuse the not-so-brilliant photos this time. It has been dull, grey and blowing a gale for the last two days and I could not get outside to take decent sample photos. Roll on Spring!
Tuesday, 8 January 2019
More mini harvest watercolour paintings
It has been a yucky few weeks with illness in the family so my memory is a bit all over the place but it occurred to me that I never showed my harvest paintings. I was overtaken by the need to use some bright colours and came up with three little watercolours. The bright yellow came from quinacridone gold. It is the most wonderful tube of paint - the colour of sun dried tomatoes in the tube, fabulous orange with a little water added and golden yellow with a bit more water. It has to be one of the most versatile colours I have used. Mine was Schmincke brand but other paint manufacturers make it too. Magic in a tube.
As always, they are available to buy on my web site, Etsy and Folksy


As always, they are available to buy on my web site, Etsy and Folksy


Subscribe to:
Posts (Atom)