Monday 17 December 2018

A couple of cuties

I thought you might like to see a couple of items I sold recently. I found a couple of mini frames lurking in my craft drawer and thought they would work really well as double sided miniature paintings. So I got to work painting a moon gazing hare and a foraging badger. The final outcome pleased me and I was so pleased when they went to a good home. Sadly I cannot find these mini frames anywhere now but I do have some square ones that might work nicely.


Tuesday 11 December 2018

Landscape paintings for a snowy winter

As it is now early winter my thoughts have been turning to snow. It is time to paint some snowy landscapes in the hope that real life will mirror fantasy and we'll get a good snowfall this year.

As always, they are available to buy on my web site, Etsy and Folksy


Saturday 1 December 2018

The great delay of the paper beads

At long last, only two months late, I have new bead designs on Etsy. To say it is a relief is an understatement. The prototypes sat in my 'to be made' pot for months after printing them out but due to work and personal issues they never got finished. They looked sad sitting naked, without their coats on. Anyway, they are done now - just in time for the festive season.

The first set is called Elven Crown. They reminded me of the fine craft work in the Lord of the Rings movies with swirls and scrolls.


I went a little nationalist with the next lot - Flame of Scotland. These have mustard coloured thistles alongside turquoise thistle leaves on flame orange backgrounds. For some reason they remind me of New Year.


Then I went all garden inspired. These beads are called Midnight Garden and reminded me of the garden late at night when the bright colours of the daytime flowers became muted and ghost-like.


Then we have some Marigolds. My Mum planted marigolds in the garden every summer when I was growing up - that is until she got fed up with the insect life that took up residence in them.


Then we have a Rainbow Garden. Swirls and flowers in multicolours. They will certainly cheer up a winter craft project.


And finally, Tribal in neutral colours with a pop of colour. Phew!


Monday 26 November 2018

Proof of new bead designs

Proof that, at long last, new bead designs are being created They should have been released in late summer but due to some personal issues (which I hope to blog about soon) I never got around to finishing the prototypes. These ones are all prototypes so there is no guarantee that they will all be made available as sets. Sometimes they just don't work as designs and end up in 'The Pot of Shame'. I will 'announce the winners' soon.

Friday 17 August 2018

Harvest paintings in watercolour

There have been some paintings on my board over the last couple of weeks. The light and the colours of the fields have been hypnotising. The really hot weather has passed and now we are getting heavy skies with rain interspersed with sunny spells. That's a great combination when the fields are golden. The contrast between the bruise coloured skies and the golden fields make some great images. The first five paintings are of the fields around my home. The rest are of other parts of Scotland.

Scottish Borders harvest landscape at sunset watercolour painting

Scottish Borders harvest landscape watercolour painting


Scottish borders harvest hills watercolour painting

Scottish landscape watercolour painting with loch

Scottish landscape watercolour painting with sheep

Scottish watercolour landscape painting with sheep #2

Scottish watercolour landscape painting with loch #2

Miniature Scottish watercolour with sheep

As always, they are available to buy on Etsy or on my web site.

Monday 6 August 2018

Silk cord and paper bead bracelet tutorial

Some time ago I wrote a tutorial for a bracelet kit I produced - then stopped selling the kits. I also stopped selling the small paper beads as they were too fiddly to work with but the instructions work really well with my longer beads too. So I thought I would share the tutorial here for anyone who has bought my paper beads or silk cords. If you are interested, I have another plain silk cord bracelet tutorial which you can find here. It doesn't use beads and makes a really nice stacking bracelet. I hope you will give them a shot.


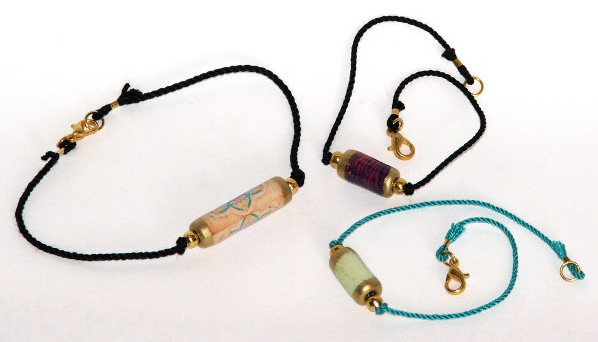
These little bracelets evolved after I discovered how to make silk cord. I had been asked to make some tiny paper beads years ago and thought they would be ideal for making some simple jewellery. I hope you will enjoy using this tutorial and find it straightforward and fun.

Tools required:

Scissors (any scissors that can cut silk cord are fine)
Crimp pliers (also called crimping pliers or a crimp tool) and ordinary pliers for opening jump rings

Materials:


1) Threader x 1,    2) Lobster clasp x 1,     3) 5mm jump ring x1,    4) 4mm jump ring x 1,

5) 3mm crimps x 2,   6) 4mm metal spacer beads x 2    7) 1 inch long paper bead x1    8) Silk cord x 1

All these items can be found in my Etsy store:

Silk cords in a variety of colours
Paper beads
Findings


Method for a 8 inch (20.5cm) long bracelet: Tips are included for making a longer/shorter one.

 1. Put the end of the silk cord with the knot between the two legs of the threader. You can also use a piece of sewing thread in the same way as I use the threader.


2. Thread a crimp onto both legs of the threader.


3. Pull the crimp onto the silk cord so that a small loop forms. Don't pull the crimp all the way up to the knot. You will be trimming the knot off later. Leave a 'tail' of roughly half an inch (1cm) between the crimp and the knot.


4. Use your crimp pliers to squeeze the crimp closed. Trim the knot off of the short end of the silk cord leaving a short tail. You don't want the tail to pull out of the crimp at any time so make sure there is enough left. Three eights of an inch (8mm) should be plenty.


5. Measure three inches (7.5cm) along the length of the cord from the end of the loop. Tie a knot. If you have a thicker or thinner wrist then make this measurement longer or shorter, e.g. 2.5 inches (6.5cm) for a 7.5 inch (19cm) bracelet or 3.5 inches (9cm) for a 8.5 inch (20.5cm) one. These measurements were worked out using a 1 inch long bead, two 4mm spacer beads, a 4mm jump ring, a 5mm jump ring and a small lobster clasp but if you use different size beads you will need to adjust the measurement accordingly.


6. Treat the un-knotted end of the silk cord with a stiffening agent to form a makeshift needle. I apply PVA glue to the last half inch (1cm) of the unused end, squeeze it firmly and roll it. Leave it to dry for 10-15 minutes then cut through the glued part at a 45 degree angle to get rid of the knotted end and make a point. You can also use nail varnish, Diamond Glaze or Glossy Accents to get the same effect. Then thread one metal spacer bead on the cord followed by the decorative paper bead and then the other metal spacer bead.


7. Tie another knot to secure all the beads on the cord.


8. Place the long end of the silk cord through the legs of the threader as you did in step one. Measure three inches from the second knot (next to the beads) and move the threader to that spot. (Remember: if you used a different measurement in step 5, make this measurement the same, e.g. 2.5 inches (6.5cm) for a 7.5 inch (19cm) bracelet or 3.5 inches (9cm) for a 8.5 inch (20.5cm) one.) Pull the crimp onto the cord leaving a small loop. Squeeze the crimp closed with the crimp pliers.


9. Add the 4mm jump ring to one of the end loops and the 5mm jump ring to the other. Attach the lobster claw to the 5mm jump ring and you have finished your bracelet. Wear it with pride.


Copyright © 2015 Gillian McMurray. Please do not reproduce any part of this document without the express permission of the copyright holder.

Friday 27 July 2018

Photos from Scotland's heatwave

As I may have mentioned before, it has been very hot here. Up to 33 degree Celsius, which for Scotland is not normal. However it has meant a lot of really nice sunsets and an opportunity to play with my camera. Although we have not had much rain, we have had some wonderful skies and the colours of the landscapes have been stunning. So, while I have been melting into a greasy spot over the last few weeks, there have been some bright spots too.


Friday 20 July 2018

Home made knitting bags

Recently my Mum got new curtains for her kitchen. As always seems to be the case with shop bought curtains, they were way too long and she had to cut them to fit. The offcuts were adopted by me. So, when I was looking to try out some project bag designs I headed straight for the spare fabric.


I managed to get three bags out of one of the remnants. The first one is a medium size bag that I am keeping my current knitting in, a scarf using Olann 4 ply yarn. It was made by folding a rectangle of fabric in half, stitching up two sides (remembering to add the handle to one side before stitching) and adding a zip to the top. Not rocket science and does the job very well. The Olann yarn is wonderful, by the way. I'm very excited about using it.


The next one was made using an image I found on Pinterest. Unfortunately I cannot find it now but there were no written instructions, just a picture of a pattern and a few photos to show the construction. So it was all a bit hit or miss - and a few choice words. But it worked out OK. It's a cute little cube bag that will hold my smaller knitting tools like stitch markers, measuring tape and stitch counter.


The last one is a bigger bag. There is a canvas knitting bag that is very popular at the moment. I have seen them on a few blogs and vlogs. However, when I went to check them out I choked on my cup of tea when I saw the price. What? £60 for a project bag!!! (That's $65 US or €68.) Erm, there is no way I could afford to pay that for a project bag, even if it was rather nice. So I tried to make a similar design myself, without a pattern.

The 'real' project bag has a very simple construction. No fancy panels, it's pretty much cut from one piece of fabric, has no lining and just a couple of pockets inside. I didn't want to copy the design precisely but there were some elements that I liked, e.g. the yarn guides on the inside pocket and the drawstring.  I also added a lining to mine as the curtain fabric was quite lightweight.


I am pretty pleased with how it looks. I hand twisted my own drawstring using some 4ply woollen yarn I had in my stash. The eyelets were the hardest part. The instructions always say, 'tap lightly with a hammer' when they really mean 'beat the 'so-and-so' into submission using all your strength'. But it is done and I am happy. It is my first fully functioning knitting bag with lots of pockets and with a multitude of uses.

Thursday 12 July 2018

Return of some favourite paper beads

I have some favourite paper beads back in stock after a year on vacation. Vintage Music, Vintage Script and Day of the Dead are all back on Etsy. They were some of my best sellers for years but, eventually, their popularity waned and I gave them some time off. In October, however, my Etsy store (and the beads) will be 10 years old and I feel it was only right that these beads get to take part in the celebrations. More news on that to come nearer the time.


Saturday 7 July 2018

What on earth is a lotion bar?

This week I made some lotion bars. I don't know about you, but I had never heard of them before. It turns out that they are a solid form of skin softener, much like lotion in a bottle, but in a bar. I came across them by chance last week while watching a knitting podcast. I had to investigate.


Basically, they are a combination of natural fats and oils that can be scented with essential oils. When set they are used by rubbing them over the skin, rather like you would use a bar of soap but without the water. They are really simple to make - I mean REALLY simple. I have always loved making my own beauty treatments (when I was growing up my Mum's bathroom looked like a war zone after some of my 'experiments') so I had to try it.

This is the basic recipe that I used. Equal measures of shea butter, beeswax and coconut oil. As simple as that. The recipes I read were all American which meant 'cups' were mentioned as units of measure. But as long as you are using equal quantities it doesn't matter how much or how little you use. You could use a tea spoon of each for a very small quantity.

I found a seller on Ebay selling 25g bags of shea butter and used 25g each of the coconut oil and beeswax which I happened to have at home. These small quantities made 12 little 'bars' for my own use. You need to use a 'double boiler' or 'bain marie' style set up. I used a jar sitting in a saucepan with water (see below) and set it over a low heat until everything was melted. It took about ten minutes. Then I poured the liquid carefully into an old silicone mould I had in the cupboard. I have read that they last for six months to a year but they do need to be kept out of direct sunlight and away from heat - otherwise they melt into a puddle of goo.

My 'double boiler' in action

Lotion bar recipe:
25g of shea butter
25g of coconut oil
25g of beeswax
Essential oils of your choice

Method:

Put all the ingredients into a double boiler and bring the water to a gentle simmer. Heat all the ingredients using a low to medium heat until melted, stirring occasionally. Once everything has melted and combined, add the essential oil to suit your own sense of smell. Pour CAREFULLY into a silicone mould or ice cube tray. Leave to cool and set (you can put the moulds in the fridge to speed this up).


I did not use any essential oils in my first batch but did for the second. It actually took more oil than I expected to get a subtle scent so it really is about trial and error. Just add a little at a time until you get a scent that you like. You can mix essential oil scents too. I used patchouli and rose. The natural smell of the oils is very pleasant though.

As I work with paper so often I find that my finger tips get very dry and rough. Since I started using the lotion bar my fingers are much less dry. Definitely a thumbs up from me.

If you would like to know more, the best article I read on the subject is by Little Pine Low Carb. She goes into lots of detail about using beeswax (or not using beeswax) and gives some wonderful recipes. I now know what people will be getting for Christmas this year. By the way, the mixture makes great lip balm too.


Saturday 30 June 2018

Miniature wildlife watercolours

Miniature wildlife watercolours - that's a bit of a mouthful to say - but it was what I was painting last month. Some little animal portraits of a rabbit, puffin and badger. Like the paintings I mentioned last time, they are 2 inches square on 4 inch square rag moulded watercolour paper. They are such a good size to paint as they can be done quickly when I am trying to fit in painting time. I particularly like the scruffy badger.

Miniature wildlife watercolours badger puffin rabbit


As always, they can be found on Etsy or my own web site.